Monday, April 18, 2022

Stug III on Flatcar

 This is a combination of a Dragon Pro series kit ( NOT ) which is pretty crappy for the money, and a Modelcollect flat car, which was workable. 


I was able to enhance the Stug II with some Black Dog stowage. This brought the kit some life. 

I added some additional bits of stowage to the rear of the flatcar and blocked the tracks for travel. 

The fun part of the rail car was painting the wood deck and setting all of the tiny decals. These kits come with good rails, just need some painting up.

Overall I was pretty happy with the resulting effect. 

Vince B. 4-18-22 


Tuesday, March 1, 2022

38 (t) Hetzer

 This is the Tamiya kit in 1/35 scale. Relatively simple to build as expected. The Hetzer is a small 2 crew vehicle so it has little bulk to it. 


This vehicle was built entirely out of the box with added wire antenna (removable). Yes I resisted the urge to add stowage. Very much of a struggle.
I used this to practice my weathering layers. I painted the tank with the 3 color camo, Tan , Green, Brown enamels and did some basic shadowing and chipping. Then I Heavily gloss coated with floor wax. I sprayed light coats in streaks of white, then brushed off streaks with a lacquer dipped brush.  After another clear coat, I pin washed and chipped. I sprayed on another gloss coat and another layer of white.


Being as it is still winter, I wanted it to look cold so used some snow and ice effect products on the ground work and vehicle. 

Vince B.


Saturday, February 5, 2022

Tigerzahn (Tiger Tooth)

 Modelcollect 1/35 scale German Paper Panzer Dreams..... Bad Dreams. Though the kit design of this Tiger III was fantastic, I wanted to to make beyond any creation of a paper panzer. There are lots of added details including the barrel extension, supports and recoil springs.

I enjoyed creating the camo scheme using the modeling putty in random string patterns. Ultimately it fit well into the forest scene like real camo. 

I performed at least six separate weathering layers over the white including rubs with lacquer thinner for chipping and wear.


Creating stowage decks over the intakes took some scratch build and fit time. The rear of the turret is so long that there is little room stowage that would not get knocked off. So basics such as jerry can racks and some small crates of supplies.


I needed to show off the camo so set this all up in a frozen deep forest scene including that scratch built figure I showed before. I think it looks cold.

Vince B.


Tuesday, February 1, 2022

Panzer 38T

 This is the fist TriStar kit that I have built. I was impressed with the detail and quality of the fit. I know this was an older kit and TriStar had a good reputation before being bought out by Hobby Boss.

I happened to have an old Legend stowage set for the Italeri version.  I was caeful to select which components would fit well and what plastic parts of the kit to leave off. I then superglued the resin pieces in place and completed assembly with most of the stowage on.


I did have to re-arrange some of the kit tools in order to make them visible. 

I used thin strips of masking tape as belts and straps on the turret for the personal stowage items.  After hand painting all of the details I was able to weather the entire vehicle to blend.


I am pretty happy to enter this in our 38T club challenge for July. 

Vince B.


Breakfast In The Desert

 This is a 1/72 scale diorama of a Long Range Desert Group vehicle in the Sahara. The Chevy truck is from Dragon, the figures from D-Day Miniatures, and the base, stowage and some other truck details are from Black Dog. Painted with acrylics with oil washes.


Monday, January 24, 2022

Flakpanzer on Flatcar

 This is a combination of 2 distinct 1/72 scale kits.  The Rail Car is a Modelcollect and the 55mm Flakpanzer is a Dragon kit. Both are pretty well detailed but boring individually.


I added some details to create a FUSION of the two into a single interesting piece. 

I simulated tarped crates by using small blocks of balsa wood wrapped in a piece of glue soaked paper towel and tied with thread. Chains were carefully hooked around the rail tie downs and the tank lift eyes. The small crates in front I believe were Geoffy Models resins before they were turned into Black Dog.

Vince B.


Tuesday, January 4, 2022

3cm Flakvierling

 This is a Das Werk kit of an experimental 3cm quad AA gun emplacement. This had large drum magazines with 3cm shells as seen on the loading pallets.

The kit was very detailed and engineered to fit well. I found no problem with the parts or the instructions, The instructions were color coded to illustrate which parts were being added on each step, along with a check list.


I used my typical enamels through my airbrush along with oil washes.


Vince B.


Monday, January 3, 2022

Coffee Break

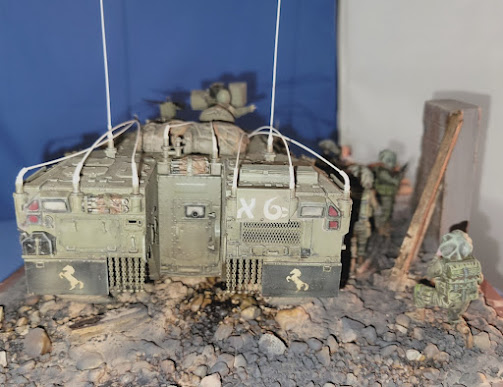
 You will have to take a real hard look at this one to figure it out. The model is the MENG Namer kit which a group of us have been working on together. The figures are also MENG. Since we were all doing the same kit though it comes with options for 3 different versions, I opted to use the figures in an appropriate set diorama.


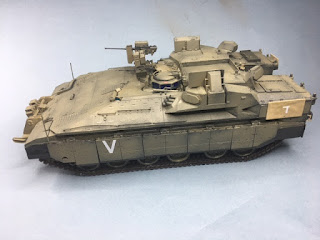
The Namer is an Israeli made Heavy Armored Personnel Carrier based on the Merkava IV Chassis. It is the  highest protected APC made so far. As you can see the vehicle is huge with a crew of 3 and a capacity for a full squad of 8 infantry which exit from a ramp in the rear.


Though the kit is very well detailed a few bits were added for effect. I used Fiber Optic line and wire wrap to make the bent antennae and tied down using EZ Line.

The flags were just reduced sized prints from the internet. Those are on K & S wire. I threw in some plastic and resin stowage strapped onto the grab bars with strips of tape.


The table and chairs etc were from a MINIART set. I added some resin bits and a printed map and pin up. The sandbag an wall bits were from old Verlinden plaster diorama sets. Groundwork was a combination of yard dirt and gravel mixed with some Hudson & Allen debris,


The focus group will  bring in our Namer builds to the Feb meeting for the club inspection.

Vince B.


Saturday, January 1, 2022

"For the Fatherland" Wehrmachthelferin

 This one is a bit of a stretch.  Though Germany did have many women soldiers, mostly in non combatant rolls, this displays a final desperate measure of putting women in combat. "Wehrmachthelferin" = Wehrmacht Auxiliary.


The tank is a Trumpeter kit with pre-stamped sheets of Zimmerit. The kit went together well, including the individual wing nuts on the tool clamps.
The tracks were individual link which I made into sections. 

The tank riders were a set from YUFAN, wonderfully sculpted and perfectly fitting parts.

The commander was of an unknown manufacturer similar to the Yufan. 


I was happy with the overall weathering outcome which brings out the zimmerit details.


Sunday, December 12, 2021

Desert Cats / Desert Foxes / Barbie's Chariot

Finally got this finished. This is an Academy Merkava Mk.IV LIC built almost box stock. The ball-and-chain armor was made by putting drops of super glue on the ends of the included photoetch chains. Strangely, even though the kit is of the LIC variant, it only comes with 2 of the 4 LIC corner markers, so I scratch built all 4 using resin spring mounts and fiber optic line. The flag antenna was made the same way with an ETA Israeli flag attached. Using Meng Namer kit parts for a master, I cast a stretcher out of Milliput to hang on the back of the tank. I also replaced the link-and-length kit tracks with SanXin Model assembled metal track.


This model represents a tank of the Edom Division, Paran Brigade, Caracal Battalion. The Caracal Battalion is a mixed sex battalion with some all-female tank crews. The crew figures are from Miniart, Black Dog, and Royal Model. 


The shield on the back of the turret basket is the insignia of the Paran Brigade. Some tanks carry them and they are hand made by the crews out of wood. Mine is made from sheet stryrene. I also hand painted most of the white markings on decal paper as I could find no proper decals for this battalion.


Stowage is from Black Dog and the rear basket covers are made from parchment paper. AFV Club Anti-Reflective Glass stickers were used on the kit glass (seen as metallic yellow and red in the photos).


The base is longer than needed because it has a cover which is needed to clear the figures and the flag. The only case with proper height was extra long. It would be nice to put something in that space, but I don’t know what.


Also don’t really have a firm name for the diorama (vignette?) yet. “Desert Cats” is a play on Desert Rats using the fact that a Caracal is a wild cat. “Desert Foxes” seems a bit sexist even though a fox is on the insignia of the Edom Division. “Barbie’s Chariot” came from the fact there is a tank in the US Army called “Barbie’s Doll House” because its commander is a woman (and Merkava is Hebrew for chariot).


Update: Added Israeli army logos in that blank spot at the end of the base and settled on the name "Hannah and  Her Sisters".


Thursday, November 18, 2021

Meng Namer, part 2

 You have seen the beginning of the building of the new Meng kit of the IDF Namer in the post below.  There are several of us in the Houston Armor Club that are building this wonderful model.  In fact, there are several reviews in the blog discussing various steps in the building of this kit.


Here are 2 pictures of my build, painted and ready for the weathering steps.  Go get one, or two, it is a great kit!!


Enjoy your build!

Tuesday, November 2, 2021

MENG NAMER


 This is my latest project. The Meng IDF Namer in 1/35 scale. The kit is molded in grey and is nicely detailed, to the point of having the anti-skid texture molded in the upper hull.

The kit gives the modeler the opportunity to build one of three versions, and I have chosen the command version of which I will be posting photographs of my progress.

To date, the wheels and suspension are assembled and I will begin adding more pieces to the upper hull as the machine comes together.


Thats all for now, but I will keep you all posted and the project progresses.

Happy modelling!