Tuesday, March 30, 2021

M-48 A-3 Patton

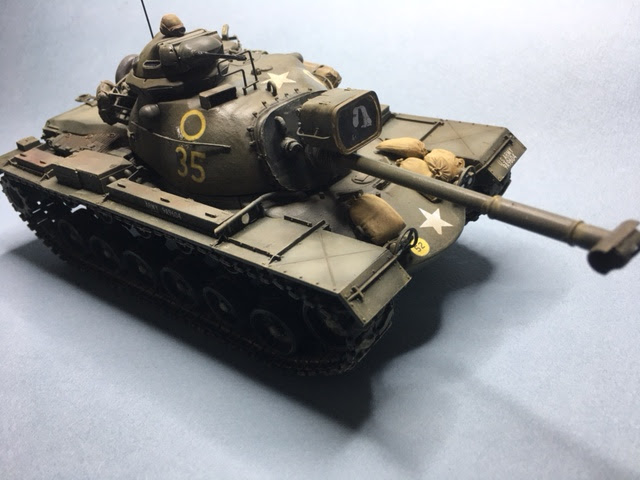
 This is Dragon's 1/35th scale M-48 A-3 Patton.  It is modeled after one from the US Army's 69th Armored Division, C Company, at the Battle of Khe Sanh in 1968.  The decals are from Star Decals.  Stowage is a mix of Legend stuff from Patton sets #1181 and #1306.  The Patton is painted with Vallejo paints from the 6 bottle set entitled US Army Olive Drab.  I only used 4 of the 5 shades of olive drab, up close, you can really see the difference in shading!  The usual washes and weathering was done, I did use "Pan Pastels" for the final shading.  I have used these before and I really like them and recommend them to our readers.


Now on to the next Patton, probably an M-60!!.  Enjoy!!

Wednesday, March 17, 2021

KEEPING UP WITH WERNER.....


I had to follow-up with my almost complete rendition of Tamiya's 1/35 Bradley Fighting Vehicle.

So far the build is straight from the box, except for some modification I did to the side skirts and some other decals from my left-overs.  I primed it with Tamiya rattle can grey primer and then used different shades of Ammo by MIG acrylics.


I have yet to finish weathering (right side) and I still plan on putting on some stowage.  I also have some other bits to add along with antennas.

It was my first Bradley too, and I appreciated the typical simple joys of a Tamiya experience.

Sneak Peek - not quite as far along, but here is my next Tamiya closing in on completion


Sunday, March 14, 2021

BRADLEY M2A2


This is Tamiya's M2A2 Bradley in 1/35 scale.
She is painted with Vallejo Acrylics Dark Sand. The stowage is painted with Tamiya Olive Green and Olive Drab. She was given a pin wash and was weathered with a combination of Vallejo Pigments and some enamel streaking.

The figures came with the kit and aren't bad, these days I am looking for how well facial features are defined, specifically the eyes as it makes them easier to paint. And these figures were well molded for stock pieces.
I also took the liberty of drilling out one of the launcher slots and inserting a projectile to simulate a TOW preparing to be launched. It is difficult to see, but up close in person it is visible. The groundwork is sand colored grout and worked well for this setting. This is my first Bradley build and I am pleased with the way it came out.


Monday, March 8, 2021

Henschel Typ 33 D1

 Yes, It,s a cargo Truck. Not a single gun to be seen. Why am I doing a TRUCK???

Well, I wanted to try something different. Also I don't normally do REVELL of Germany kits. Very fiddly bits like a ZVEZDA kit. Even with my screw ups, this didn't turn out too bad. I'm not going to tell you the stupid things I did, along with continually breaking off the Fiddleys.


I also featured the Value Gear resin accessories, which are probably the best part of the build. These resin bulk cargo blocks paint up and detail out really well.
I have to say that I did learn a lot about how that canvas cab cover works. The side windows fold up with the convertible top, so they are NOT part of the door frame, as I tried to make them originally. 
I did have some fun detailing out the windows which do have to be put on from the inside of the cab. I managed some wiper effects with the help of a circle scribe and masking tape. 

I might actually try another truck someday.

Vince B.  3-8-21


Friday, February 26, 2021

Another Magach 6B Gal Batash

 This is my Magach 6B Gal Batash, built for our IDF build competition. It is the Academy kit with some additions. 

The stowage is from the kit, Black Dog, & Dioart. The coaxial machine gun is built from some kit and some Legend parts with EZ Line for the control cables. Non-slip surfaces are made from embossing powder. (Last photo shows this on turret before painting.) Cable supports on basket are made from Evergreen L-channel. The antenna is a length of fiber optic line. The tactical insignia panels are made from aluminum foil. Figure is from the kit.

Kit is painted mostly with acrylics. The main color is ModelAir Hemp. Tracks were painted with ModelMaster gun metal lacquer. Black pin wash added. Weathering is AK Middle Eastern Dust pigment held on with alcohol.


Thursday, February 25, 2021

M-9 Armored Combat Earthmover (ACE)

 I recently completed the Takom M-9 ACE for the HAC Engineering Vehicle contest.  The M-9 is built out of the box, base coat paint is Model Master Sand, #4720, and of  course, heavily weathered.  The kit allows you to pick 3 different blade/suspension posses; driving mode, blade down digging and suspension lowered, blade up with suspension raised up.  I chose the last option with the blade up and suspension raised up.

It is modeled after an M-9 ACE serving in the 20th Engineers in Iraq.


In these 3 photos above you will see the rubble, ground cover, dirt and other debris I added to the blade and inside the bay.


And here are two more photos while under construction.  Now go back in the blog's archives and look for Vince's version with blade down and digging!  What a fun kit to build.  And am probably going to add a base and more rubble.


Enjoy!

JagdPanther

 This was for practice, out of the box, not intended for contest performance. The FUMAN kit was old Bandai so there was a lot of missing detail. 

 I didn't add a lot of details or stowage.  It did need an antenna. This was intended as E-Bay fodder.

I think these are great kits for kids to practice on. Fit is good. 


These are the kit rubber band tracks. I did hide the staples up under the armor skirts. 

Vince B 2-26-21


Friday, February 5, 2021

Gun Tower

 Todays completion is of the Fictional Gun Tower. Yup lots of scrap parts on this one. The main turret was from a French AUF something or other kit by MENG,  This was a donation by Tom Moon, The tower portion was scratch built from evergreen sheets and strips, before adding lots of other leftovers.


As recommended by committee, I made the overall color scheme dark and ominous. The figures used are unusual as they are more ~ 1/40 scale and fit my needs perfectly. 

I did put in some subtle fiber optic lighting effects with the battery and switch under the turret.


Decals were exhumed from my scraps bag. I imbedded the tower base in my hodgepodge of groundwork. This time using styrofoam sheet as the base to protect the wood from warpage. 


Vince B.   2-5-2021

Wednesday, January 27, 2021

Takom 1/35 Bergepanzer 2

This is the Takom 1/35 Bergepanzer 2.


This is the rear view. When I realized that there was a way to paint this with "candy stripped" tow bars, I immediately decided to go with this option.


I also wanted to deploy the crane, but I needed something to show for it, so I purchased a 1/35 scale Leopard 2 resin engine kit. The crane is not technically movable, however, if the modeler studies the drawings and assembly instructions carefully enough one will discover that if the correct steps are taken the crane will be operable. The rigging gave me fits and I am not satisfied with it. However the shovel is fully movable.

The crew figures are from Mengs modern German armor crew kit. I used the tracks from the Tamiya 1/35 Gepard kit instead of the tracks that came with the Takom kit. I weathered the model with a pins wash, and Vallejo pigments, and I used Vallejo's mat varnish for a dull coat. This is a decent kit but with some sanding required to take care of mild lines, but it all fits together well as is overall an interesting subject.

I made this base with plaster. Gave it a grey primer coat with enamel from a rattle can. Then painted my perpriotory acrylic concrete mix with an airbrush. After the content I put some pigment on it and will be updating later with more ground work stuff.

This was a challenging model, but it came out ok. Not sure if I am going to do another engineering vehicle, but we will see.

Monday, January 18, 2021

Syrian T34 / D30

 This was my first RFM kit that I started last year.  Nice details, a bit fidley but went together well. 

There was a bit of photoetch.  I replaced the handles with copper wire.

You might recognize that this T-34 would seem to be backward. With the turret removed, the gun needed to be placed on the front glacis plate yes, the gun is backward when in motion. This is a 122MM Howitzer. 

Surprisingly, there was no interior detail provided though you can clearly see inside. I decided to throw in some tarps and ammo cases for the main gun. 

Vince B.  1-18-21


Sunday, January 10, 2021

Magach 7C


This is another Academy kit. Its nearly the same as the Magach 6B but with the upgraded armor plating on the turret.

There are some discrepancies / errors in part identification in the instructions and some difficult options to interpret. See my notes from the Magach 6B series reports. Gather books and photos to determine which options suit you best. 

I like stuffing the turret basket with lots of stowage. A few details I did add were the solenoid and cables for the 50 cal on the mantlet and the tie down chains for the tow cables. The banners were made from wine bottle label foil. Straps are made from masking tape.

Since taking these photos I have added the antennae and painted the head and tail lights. 

I painted and masked the white stripes on the barrel. ALl done with enamels and weathered with oils. I did some sponge chipping and rubbing of worn areas.

Vince B.  1-10-21

Friday, January 8, 2021

SU-76M

This is the Tamiya 1/35 scale kit which I built from the box for our contest in Nov. Afterward, I decided to put into some groundwork.

As you can imagine, being a newer Tamiya kit, the fit on everything was perfect. Even the figures went together well and fit into the proper place in the vehicle.


The model was painted with enamels and weathered with oils.  Pigments were added for the exhaust system. I did the chipping with sponge. 
I used various tree and groundwork products to make the hedgerow.  The fence was made from coffee stirrers.


 Vince B.  1-8-21