Tuesday, June 28, 2022

Panzerlok BR57 mit Kanonen und Flakwagen

 Try to say that three times fast. These are both Hobby Boss kits. As with the others I have built, these fit together like Tamiya kits. The detail is great and seems accurate from what I can tell from books and photos. Even the tracks are well detailed.


I added some minor details which can hardly be seen between the cars. I added the brake line hoses. 
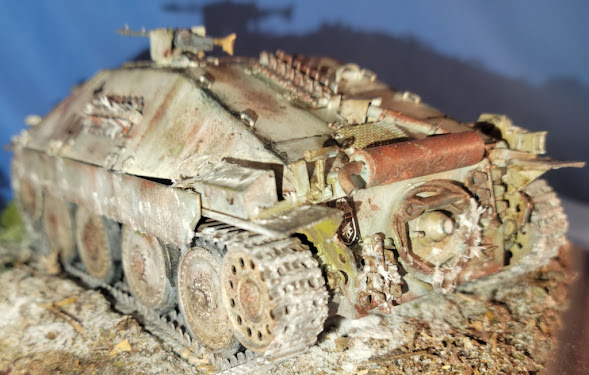
The camo pattern is free hand airbrushed with Floquil Lacquers and Model Master Enamels. I used several layers of washes and pin washes with some drybrushing to bring out the details. 


I really enjoyed this project as it allowed me to combine two kits seamlessly.  though each of the three cars were painted separately. The rail set is mounted to two planks of hardwood flooring.

 
Vince B. 6-29-22


Sunday, June 26, 2022

Green Knight

 This is an unknown 1/35 resin knock off from China. Not sure of the origination. Resin was a bit brittle and these kits do not come with assembly instructions.


The detail of the resin was great and begged for layers of paint, washes and drybrushing. All with enamels and oils to start with. I wanted the underlying suit to stand out from the metalic armor. I used layers of floor wax and green food coloring over some oil washes in the recesses.


The final layer of gloss green was done with Crystal Cleer and food coloring.


The base was from junk parts, just painted, washed and dry brybrushed. I wanted to make it look like an abandoned piece of machinery.


Vince B. 6-26-22

Thursday, June 9, 2022

"No Mans Land"

 Another 'Girls Just Want to Have Fun' diorama.  Also a Post Apocalyptic rendering using the Academy M998 kits, one of which was for the Shelf Queen club build for Oct.


Of course the figures are all combinations of Maser Box series, the same ones I had used in the 'Mad Maxine' diorama. 


You may be able to see many of the tattoos on the girls. These were from a decal set. The figures were base painted with enamels and then washed and glazed with oils. 

The signage was from the internet converted to a decal sheets and put onto posts made of evergreen scraps painted in an aluminum enamel and weathered. 
The green goo in the drainage ditch was Gloss Mod Podge with food coloring, then coated with the Woodland Scenics poured resin. Barbed wire was twisted 14 ga SIS control wire filaments.

Creating this story was a lot of fun. Some girls you just don't want to piss off. 

Vince B. 6-9-22


Monday, June 6, 2022

Panzer III Ausf. N

 I have completed my version of the Takom kit for the club build. This is the kit that I have discussed several times needing a slow build and attention to fidley bits and details. Not a weekend kit for sure, especially with the Photo Etch.

The kit is very well detailed which makes much of it delicate and hard to hold when working, mostly due to the hull and turret side armor brackets. Though they are plastic, they seem to be properly thin. 

Of course no Panzer would be complete without a pile of stowage on the back. Most of this was Value Gear. 

It did take a lot of work to get the tri color scheme well blended. Though the tank is well worn, scratched dented etc, I didn't include any battle damage.

Its passable for entry in a show, but I dont think its my best work.

V.B. 

Friday, May 13, 2022

Hotchkiss H35

This is a 1/72 scale Hotchkiss H35. The kit is from First To Fight. Velejo USA Olive Drab primer was airbrushed onto model, then Polly Scale US Sand was brushed on, and the black lines were drawn using a Zeyar paint pen. It was given an overall wash with burnt umber oil paint.


Had to prove someone other than Vince was building models. :-)
(And the cat hair visible in the last photo has been removed.)

Friday, May 6, 2022

Classic Build with Tamiya Flakvierling and Sandbags

 This was a tough one, OUT OF THE BOX, completely. Per our club contest requirements, these CLASSIC Tamiya kits (091 & 025) were combined to make this. 

The Flakvierling kit includes some accessories like the replacement barrel case and a few other equipment boxes with the shell magazines. The trailer was pretty well detailed for its time, and the instructions on the gun show how to modify for a traveling  position.

I thought this would look best in the desert with lots of rocks and sand to go along with the sandbags. It also allowed me to show off some chipping and scratches with rust. 

I am pretty happy with the results for what it is.

Vince B.  5-6-22


Sunday, May 1, 2022

Marder I on Trailer

 You had all seen me working on both the Tamiya 1/35 Marder I as well as the Das Werk trailer kits. I had been showing progress on the Thursday night calls. The combination was a perfect fit.


Of course the new Tamiya kit was as perfect as it gets. The only added detail was the radio set wiring and head phones. All else was adding of the Value Gear bits. 


I had been practicing on my chips and scratches and am satisfied that I got the hang of it now. 
The Das Werk kit allows for several options in positioning. The rear wheels can be removed and the ramps put in place. There are two styles of ramps provided. Even the front wood panels can be in the raised position. I decided to pose the Marder already stored in place.
Unfortunately, most of the detail painting of the wood planks gets hidden away under the dirt work. 

Overall I got the effect I wanted and it only takes up one space in the display case instead of two. 

Vince B.  5-1-22


Monday, April 18, 2022

Stug III on Flatcar

 This is a combination of a Dragon Pro series kit ( NOT ) which is pretty crappy for the money, and a Modelcollect flat car, which was workable. 


I was able to enhance the Stug II with some Black Dog stowage. This brought the kit some life. 

I added some additional bits of stowage to the rear of the flatcar and blocked the tracks for travel. 

The fun part of the rail car was painting the wood deck and setting all of the tiny decals. These kits come with good rails, just need some painting up.

Overall I was pretty happy with the resulting effect. 

Vince B. 4-18-22 


Tuesday, March 1, 2022

38 (t) Hetzer

 This is the Tamiya kit in 1/35 scale. Relatively simple to build as expected. The Hetzer is a small 2 crew vehicle so it has little bulk to it. 


This vehicle was built entirely out of the box with added wire antenna (removable). Yes I resisted the urge to add stowage. Very much of a struggle.
I used this to practice my weathering layers. I painted the tank with the 3 color camo, Tan , Green, Brown enamels and did some basic shadowing and chipping. Then I Heavily gloss coated with floor wax. I sprayed light coats in streaks of white, then brushed off streaks with a lacquer dipped brush.  After another clear coat, I pin washed and chipped. I sprayed on another gloss coat and another layer of white.


Being as it is still winter, I wanted it to look cold so used some snow and ice effect products on the ground work and vehicle. 

Vince B.


Saturday, February 5, 2022

Tigerzahn (Tiger Tooth)

 Modelcollect 1/35 scale German Paper Panzer Dreams..... Bad Dreams. Though the kit design of this Tiger III was fantastic, I wanted to to make beyond any creation of a paper panzer. There are lots of added details including the barrel extension, supports and recoil springs.

I enjoyed creating the camo scheme using the modeling putty in random string patterns. Ultimately it fit well into the forest scene like real camo. 

I performed at least six separate weathering layers over the white including rubs with lacquer thinner for chipping and wear.


Creating stowage decks over the intakes took some scratch build and fit time. The rear of the turret is so long that there is little room stowage that would not get knocked off. So basics such as jerry can racks and some small crates of supplies.


I needed to show off the camo so set this all up in a frozen deep forest scene including that scratch built figure I showed before. I think it looks cold.

Vince B.


Tuesday, February 1, 2022

Panzer 38T

 This is the fist TriStar kit that I have built. I was impressed with the detail and quality of the fit. I know this was an older kit and TriStar had a good reputation before being bought out by Hobby Boss.

I happened to have an old Legend stowage set for the Italeri version.  I was caeful to select which components would fit well and what plastic parts of the kit to leave off. I then superglued the resin pieces in place and completed assembly with most of the stowage on.


I did have to re-arrange some of the kit tools in order to make them visible. 

I used thin strips of masking tape as belts and straps on the turret for the personal stowage items.  After hand painting all of the details I was able to weather the entire vehicle to blend.


I am pretty happy to enter this in our 38T club challenge for July. 

Vince B.


Breakfast In The Desert

 This is a 1/72 scale diorama of a Long Range Desert Group vehicle in the Sahara. The Chevy truck is from Dragon, the figures from D-Day Miniatures, and the base, stowage and some other truck details are from Black Dog. Painted with acrylics with oil washes.