Saturday, December 29, 2018

Syrian T-72

This is the Modelcollect kit, of course in 1/72 scale. BUT stay tuned for 1/35 scale Modelcollect kits.

 I love the detail on these kits and the wide range of subjects. In 1/72 scale there are a lot of fidley bits requiring steady hand and tweezers.

 I had lots of fun with the weathering. After the enamel coats and gloss wax, I used heavy oil wash solution with turpenoid to really get into the multi layered details.
 After several dull coatings, I drybrushed the whole tank. 
Details I hadnt seen before just popped out. I am really happy with the result. 

Vince B.  1-1-19

Armor Train

These are from the recent 1/72 scale Hobby Boss rail series of the Panzerzug ?? armored trains.

 Though there are many more rail cars to come, I only have room for 2 at a time. 
 These are relatively detailed.  The hardest part for me was in keeping the wheels aligned.
 There is very little room to work with setting the wheels on the tracks and keeping them there.
After the standard Enamel paints and lacquer dull coat, drybrushing the details took some time.

Vince B. 1-1-19

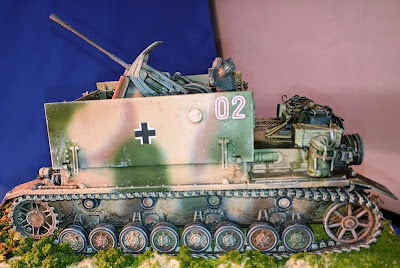
Flakpanzer IV Mobelwagen

Tamiya 1/48 scale kit. If you don't already know, this series of kits are relatively simple and just begging for some add ons.

 I have been using smatterings from Black Dog resin stowage sets.
 There are many custom resin sets made specifically for these Tamiya kits. I combine these with loose personal gear from the Tamiya figure sets and add some thin tape straps. I really like these kits and have at least 6 more to build.


Vince B.  1-1-19


Braille Scale Tanks

Below are my three latest builds, all in 1/72 scale. All were painted with acrylic paints from Velejo & Tamiya.

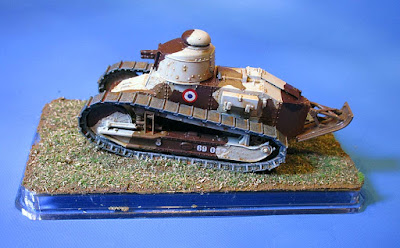
The first 2 are Renault FT17s by Flyhawk (you get two kits in the box). The green & grey one is in WWI French markings and the brown & beige one is a WWII French markings. Excellent kits with a limited amount of photoetch. Tracks are single piece hard plastic units that slide into place over the suspension units.

The third model is a WWII Polish TKS tankette. The kit is also Polish and is from First To Fight. Decent, simple kit with only a few parts. Track and suspension are molded as one unit on each side.


Note how much smaller the TKS is compared to the FT17s.  (All are on the same size base.) It actually had a 2 man crew, just like the FT17.


MERKVA Mk.1 Hybrid
Once again I was sucked in by the box art.  I had not really desired to build a Merkava but the good reviews I had been reading about the Takom kits coupled with a  web sale I stumbled upon and did I mention the box art? BOOM she was on my bench within a few weeks skipping ahead of the 15+ projects that I had going in Jan '18.  In the few weeks prior to receiving the kit I decided to try a few new techniques and products on this build (discussed below)

As always, I followed the instructions in sequence starting off with the lower hull, running gear and tracks.  Meng supplied 2 jigs for the track assembly that were a joy to use.  The length and link track went together easily.  Overall the only build issue I ran into was associated with the tow cable.  There are two cables in parallel that fit into the clamp at the end.  I had to shave down the cables to allow them to fit in the clamp.  Other than this, assembly went off without a hitch.

In the weeks before I received the kit I purchased two AMMO by MIG paint sets.  The first being the Black & White set (7128).  Although this set gives you basically matte black and matte white it's main component is the Transparator. It also gives you a washable matt white that can be used to give you a weathered winter white wash.  I will be trying that out on the next Sherman I build.  For this build I tried modulating the black and white undercoats, spraying darker in the recesses and lighter on the top surfaces.  The second set I got was the special addition of the Israel Defense Forces (7163).  I mainly used Real IDF Sand Grey 73 mixed 70/30 with the Transpartor.  The Transparator makes the base paint semi-transparent thus allowing the white & black undercoats to slightly show through the grey main coat.  I had never used this product, but sense using it on this kit I can't stop using it.  For once everything came out as advertised. 


Another new product I attempted with this build are the cardboard boxes in the stowage bin.  I found them on the net at Matho Models out of Belgium.  They come printed on card stock that looks right for 1//35 scale.  Assembling the boxes takes a new sharp blade in your knife and toothpicks to apply glue to the flaps.  A good tip I got a few years back was to use a photo-etch bending tool to pre-bend and crease the flaps before gluing.  This worked well and the boxes came out pretty good.


The remainder of the finishing was pretty standard with washes, dry brushing and pastels for weathering.  The only extra things I added not supplied directly with the kit are the stowage and the antennae .  The antennae are from stretched sprue and the bent forward one was difficult to look right.  (I think I must have attempted that bend 100 times).

Actual time spent building and weathering was about 50 hours (over a 11 month period).  I had brought it in to our club meeting half done back in April, but it took me 7 months to finish it.  All in all I'm happy with the outcome and will definitely build more Takom kits, when I get a good deal on them and I finish the other 15 projects still on my bench.

Thanks for looking - George


Monday, October 22, 2018

Iraqi Truck

Seems to be the season for oddball wheeled vehicles. My turn.  Here is a testament to "Toyota Tough" trucks. This is the MENG kit in 1/35 scale. Its so detailed you can build it as a straight up Toyota.

I have seen so many of these used in the Middle East by all sides. Mostly with some sort of field attached armament. 


I had been playing around with this for almost 2 years until I finally decided what I wanted to do with it. I already had Iranian and Iraqi flags and some leftover STAR decals from my 6 Day War items. 


 It was fun to beat it up just a bit.
I came close to doing a strafed truck, by riddling it with bullet holes, but decided to keep it functional.

Vince B.  Oct 22.

Saturday, October 20, 2018

Egyptian GAZ 69

This is the Bronco kit of the Russian GAZ 69 truck with "Babby Carriage" (which refers to the covering for over the rockets). I've built it as it as an Egyptian army version during the 6-Day War against Israel. Pretty much box stock build with tissue paper dipped in a water/white glue solution used for the "convertible top" (shown folded down behind the rockets). What few decals are on it, are actually model railroad decals that matched the Egyptian markings. Paint is ModelMaster & Velejo acrylics with oil wash.

As for building it, well... The chassis and suspension are incredibly fiddley. Amazingly, the chassis actually sat level when done. To anyone who builds one of these, I would suggest building the body off of the chassis (or at least not glued to the chassis) as apposed to building it up on the chassis, as per the instructions. Much easier to correct flaw, mistakes, etc. Although, I had to cut a good 1/8 inch off the top of the winshield frame to get the roof to fit properly.


Friday, September 21, 2018

Captured M3 Stuart

Well, for those who haven't started their Tamiya kit yet, you are really missing out on the fun. This was even a great kit out of the box. But as we discussed at the last meeting, we wanted some variety for the group build, so here is mine.

The British used the US made Stuart in North Africa.
I added various German stowage to indicate that it had been a captured tank, presumably run out of fuel without any damage. 

 The new German tank commander from his disabled SdKfz 250, swapped out the American 30 cal for his own MG34.
So as not to get strafed by his own Stukas, he throws a Nazi flag over his stowage for recognition.
Vince B.  Sept 21, 2018

Sunday, September 9, 2018

Chameleon

Another Scrap Built Sci-Fi Armor crossover. I really wanted to try a new type of camo. This was fun and I think I managed to pull it off.

I wanted the Chameleon to be able to blend into an urban rubble environment so I used battered brick backgrounds.

From the top it blends into the street. The cupola is painted up as a manhole cover when closed.

And of course it has lights.


I added some 48 scale figures to accentuate the vehicle size. It also has a detailed engine compartment.

Vince B.  9-10-18

Saturday, September 1, 2018

Sturmgeschutz III

This is a Cyber Hobby kit. It had some photo etch which I had to use.  Enough about that.
The kit was OK, pretty typical Dragon with misdirection, parts trees from other kits with the same designations.

I needed something to start on while recovering from the surgery, so the basic build went together pretty well within a week. 

I had selected this kit from my supply shelves because I had a Legend Resin stowage set for it already and hadn't built a Stug III in a while. 

I prime coated it with various greens, then top coated with white.
 I used various chipping techniques with the base colors

Finally I washed the completed tank including all of the hand painted stowage in place.
 I went back and added highlights and some additional washes in recesses.

Sept 1, 2018    Vince B.


Monday, August 20, 2018


This is the Bandai M61A5 that I have mounted to a base. Just added some grass and bushes. She looks pretty neat in her 'new' environment.