CONCEPT and RESEARCH
The Panther is my favorite flavor of all the German WWII armor. It was a tank loved by it's crews and feared by allied tank commanders whenever it appeared on battlefields from the western front to the Russian steps.
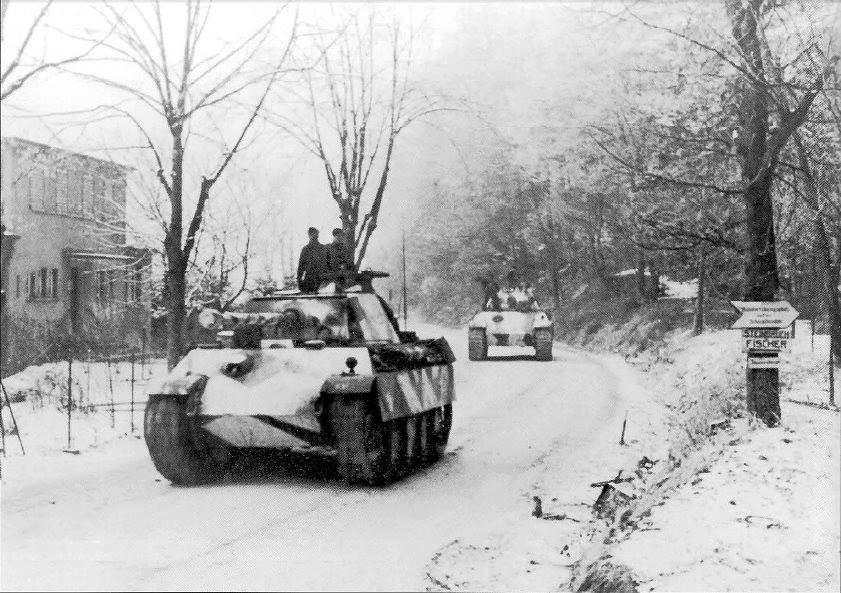
I was looking for unusual paint schemes on the internet one night and found what I was looking for. It was an unusual winter scheme from a picture taken of a column of Panther G's advancing through the Haguenauer Forest north of Strasbourg in January 1945. They were from the 1.Armee in either the 21 Panzer-Division or Pz-Abt-5 from 25.Panzer-Grenadier-Division. All of the tanks in the column seem to have a "dazzle" style of winter camo. They seemed to be painted white (not white wash) over the usual late war hard edged 3 color scheme with geometric strips and designs revealing the 3 color scheme under the white.
CONSTRUCTION AND PAINTING
 After building the model out of the box I wanted to add some texturing the turret and front glacis plates. So I used a small chisel and rotary tool to mark up the areas. I then added a diluted Tamiya putty to the areas, pushing it around in different directions to make a very rough surface. I augmented the plate flame cuts with files and the small chisel. As the putty dried I stippled it with a very stiff brush to add more depth. I started using this technique recently and I like the results. The cast hatch ring was also addressed by coating it with Tamiya Super Thin and then stippling it with the stiff brush to give a more sand cast look. As were all the cast parts in the entire project. I let this dry over night before moving to the base coat.
 All the paints I used for the base coat and 3 color scheme are from the Tamiya Acrylic line. The base coat is XF-69 NATO Black and was applied to all the parts and sub-assemblies. I then sealed them all with Tamiya clear. I used Tamiya Lacquer for the thinner of choice throughout the entire project.
 When the base coat was dried I started adding XF60 Dark Yellow with a few drops of XF3 Yellow and a few drops of XF57 Buff. After the entire tank was painted I added about 10% XF2 Flat White to the mix to add some tonal changes on the upper surfaces. I decided not to chip the white paint so no hairspray was used at this point but I did seal it with clear. It was left to dry overnight.


