CONCEPT and RESEARCH
The Panther is my favorite flavor of all the German WWII armor. It was a tank loved by it's crews and feared by allied tank commanders whenever it appeared on battlefields from the western front to the Russian steps.
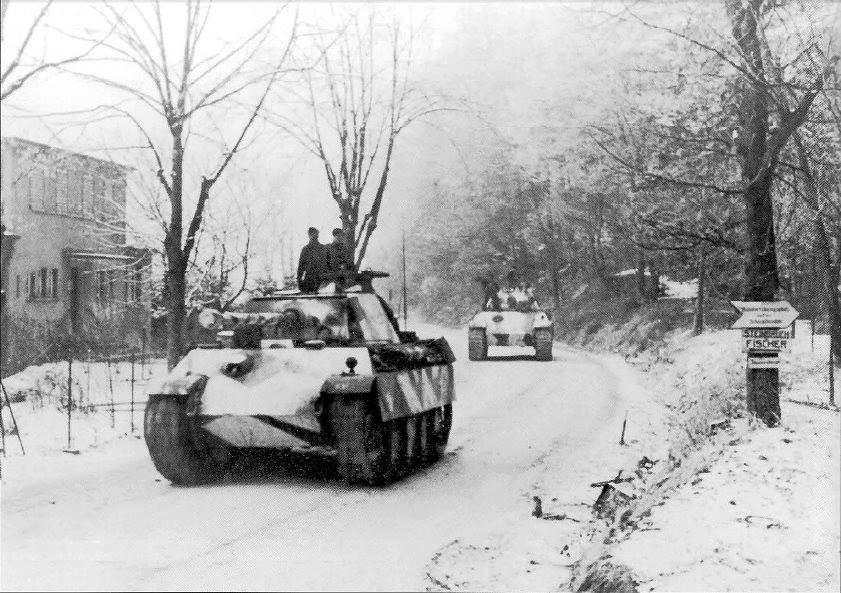
I was looking for unusual paint schemes on the internet one night and found what I was looking for. It was an unusual winter scheme from a picture taken of a column of Panther G's advancing through the Haguenauer Forest north of Strasbourg in January 1945. They were from the 1.Armee in either the 21 Panzer-Division or Pz-Abt-5 from 25.Panzer-Grenadier-Division. All of the tanks in the column seem to have a "dazzle" style of winter camo. They seemed to be painted white (not white wash) over the usual late war hard edged 3 color scheme with geometric strips and designs revealing the 3 color scheme under the white.
CONSTRUCTION AND PAINTING
 After building the model out of the box I wanted to add some texturing the turret and front glacis plates. So I used a small chisel and rotary tool to mark up the areas. I then added a diluted Tamiya putty to the areas, pushing it around in different directions to make a very rough surface. I augmented the plate flame cuts with files and the small chisel. As the putty dried I stippled it with a very stiff brush to add more depth. I started using this technique recently and I like the results. The cast hatch ring was also addressed by coating it with Tamiya Super Thin and then stippling it with the stiff brush to give a more sand cast look. As were all the cast parts in the entire project. I let this dry over night before moving to the base coat.
 All the paints I used for the base coat and 3 color scheme are from the Tamiya Acrylic line. The base coat is XF-69 NATO Black and was applied to all the parts and sub-assemblies. I then sealed them all with Tamiya clear. I used Tamiya Lacquer for the thinner of choice throughout the entire project.
 When the base coat was dried I started adding XF60 Dark Yellow with a few drops of XF3 Yellow and a few drops of XF57 Buff. After the entire tank was painted I added about 10% XF2 Flat White to the mix to add some tonal changes on the upper surfaces. I decided not to chip the white paint so no hairspray was used at this point but I did seal it with clear. It was left to dry overnight.
I started the other two colors application without changing them from the bottle. The green is XF71 Cockpit Green and the red brown is XF79 Deck Brown Linoleum. I used my favorite airbrush, the Iwata HP-C with the paint being pushed by CO2. Not pictured is the brush painting I did over the green and red brown to give them a hard edge. I didn't want any over spray or "misty" edges usually shown with an airbrush. I removed the paint from the back deck and turret ring for the final version of the 3 color under paint scheme. Once I was satisfied with the look and feel, I was ready to get going on the white. But first a great amount of masking was required to obtain the geometric shapes required to make this Panther.

 I used Tamiya tape of all widths along with Mig Putty for the compound curves, to mask the under paint 3 color scheme. This process was to take a long time. To get as close as possible I looked at the photo a lot. The more I studied it the more sense it made. I'd apply tape, look at the photo and remove it, over and over again until it looked as close to the photo as I could get it. Once masked I went back over the tape to ensure it was pressed down so there was no bleeding white paint under the tape. I had spent too much time and effort to this point to make a mistake like that. I was ready.
I mixed the XF2 with a drop or two of XF55 Deck Tan to knock done the starkness of the white. I started with the now removed steel wheels. After painting the with the white mixture I applied a very heavy oil paint wash. I added a bit of weathering by brush and set them aside to cook up.

I checked the tape one last time and started with a light coat on the tank and side skirts. I continued to move the airbrush in different directions to simulate how I thought the white might have been applied in the field. I made the assumption early on that this was not factory paint because it was in this particular unit and didn't seem to be a factory run of this unique winter scheme. When the white over coat was dry I removed the Mig Putty and the tape to reveal what I had hoped. However, the edges were a bit built up where the tape had been so I used a 600 grit sanding stick to carefully remove the edge. I then used clear to seal this over coat and let it dry over night. I glued on the road wheels using super glue and then put on the already painted tracks. The rubber band tracks for this kit are pretty detailed and held paint superbly. They had been painted with a mixture of XF68 NATO Brown and XF1 Flat Black. I didn't add a wash to the tracks at this point. I wanted to make the weathering of the road wheels and the tracks to be contiguous. I added the spare tracks to the side


Using oils I added a bit more weathering in the form of pin washes and light streaking. I knew my version of this tank was to end up very muddy. To accomplish this I decided to try the Vallejo and Mig "mud" products everywhere on the market. I applied the mud products to the tracks, the under part of the glacis and rear of the tank.
I glued the side skirts on with super glue and started placing mud product on them. I then mixed up some very thin acrylic paint and "speckled" the side skirts, under the glacis and the rear of the tank. Lastly I added the same color mud product to the outside of the tracks at random points.
Final Look


7 comments:
John
That is awesome and you did all that in a week. Cant wait to see it Thursday night.
Vince -
It took me about 4 weeks on and off again. You know how that is. Today I went back and added more wet mud to the tracks and side skirts and road wheels. I couldn't help my self. It's never over till the fat lady sings!!
LA LA LA!!
Stunning coloring and really high quality work.
Thank you Maximex!! your very kind. I enjoyed this model and I got to try out some new techniques.
Looks great, makes me reluctant to bring my bulldog tomorrow night. I was thinking about starting to collect stamps anyway.
George -
Please keep building. Stamp collecting is a great hobby but model building puts you there in the tank with the crew. I tried some new techniques that happened to work out, that's all. I'll have it there tonight and will be available to answers any questions you may have. It was a fun build but scary cause I used those new (to me) techniques.
KEEP BUILDING!!!
The Panther has the coolest lines of any WWII AFV period. Inspired by the T-34 it, ended up being the driving force behind the post war MBT concept.
You did a very fine job with this model!
Post a Comment