"IT's A MAD, MAD, MAD, MAD WORLD"
http://www.imdb.com/title/tt0057193/?ref_=nv_sr_1
This photo is not armor (be careful) but I thought I'd share it non the less.
The world of model building extends to many areas. Like for example, Hollywood.
The photo shows Hollywood model maker Jim Danforth adding figures to the fire ladder for Stanley Kramer's famous scene in "IT's A MAD, MAD, MAD, MAD WORLD". One of my favorite scenes in the entire movie as the ladder is shown catapulting people (figures) in all directions.
Hope you enjoy this non-armor item!!
Saturday, April 15, 2017
Friday, April 7, 2017
2cm FlaK on SdKfz 7 chassis Halftrack
Here's my German halftrack with a quad 20mm mounted on the bed. I enjoyed building this kit and adding the many chips and scratches. I went a little overboard but it was satisfying even so. My paint chips are of two colors...a lighter shade of the yellow followed by a smaller dot of dark brown If you look closely, you can see both colors in the chips.
As usual, I think I could have done a better job weathering this model, but I am very happy with the results I came up with.
Sunday, March 26, 2017
BUILD - Panther ausf. G Steel Wheel Version using Tamiya kit # 35174

CONCEPT and RESEARCH
The Panther is my favorite flavor of all the German WWII armor. It was a tank loved by it's crews and feared by allied tank commanders whenever it appeared on battlefields from the western front to the Russian steps.
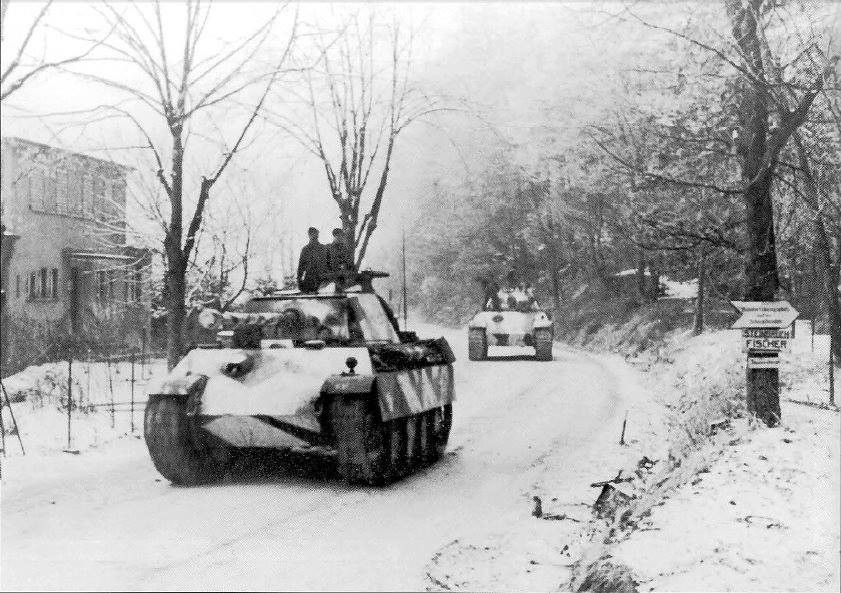
I was looking for unusual paint schemes on the internet one night and found what I was looking for. It was an unusual winter scheme from a picture taken of a column of Panther G's advancing through the Haguenauer Forest north of Strasbourg in January 1945. They were from the 1.Armee in either the 21 Panzer-Division or Pz-Abt-5 from 25.Panzer-Grenadier-Division. All of the tanks in the column seem to have a "dazzle" style of winter camo. They seemed to be painted white (not white wash) over the usual late war hard edged 3 color scheme with geometric strips and designs revealing the 3 color scheme under the white.
CONSTRUCTION AND PAINTING
When the base coat was dried I started adding XF60 Dark Yellow with a few drops of XF3 Yellow and a few drops of XF57 Buff. After the entire tank was painted I added about 10% XF2 Flat White to the mix to add some tonal changes on the upper surfaces. I decided not to chip the white paint so no hairspray was used at this point but I did seal it with clear. It was left to dry overnight.
Saturday, March 25, 2017
Trumpeter 1/35 Russian PL-37
So far, this is the best of the Trumpeter armored train series. The assembly just falls together. It can easily be done in one day, adding the fidley bits on just before painting. Plastic is well detailed and there is no additional drilling reaming or sanding needed.
I left the rail wheel assemblies as separate components as I did each turret. Made the final painting sequence easier. Its hard to see the wheels anyway but I wanted to paint and weather them in the iron rust color. I free hand airbrushed the general pattern of the tan green and black to better coincide with the real process. There wouldn't be any masking or hard edges. I then hand painted the details of the linking hardware, and machine gun barrels. After several coats of gloss I began the oil wash process in layers of Burt Umber and Black. This softened the camo pattern and allowed all the bolt hardware patterns to stand out.
After several rounds of DullCoating, I began to pin wash the rust and wear around hatches, doors and hinges. More dullcoating then drybrushing to make the details pop and soften some of the over rusted edges.
Vince B 3-25-17
Tuesday, March 21, 2017
Meng Merkava III D
Yes, this is a great kit from Meng. I am sure I don have to tell you why, but I will. No Photoetch, and as we discussed in my presentation last year, Its got Great Balls. They were injection molded plastic, so I didn't have to thread tiny beads or use photo etch. They are correctly proportioned as balls should be.

There was some minor warping of the large upper hull, so you will need to add bracing inside, around the turret ring to allow the turret to fit properly and not scrape the balls. Always bad to scrape your balls.
I did find some great in action photos on line that I used for ideas on weathering and base debris. A few details added were the stowage canvas bags from clean paper towels and the antenna which is wire and wire wrap.

Vince B. 3-22-17
The details are great including the Tow Cables which were provided. A few tips though, be sure to measure the cable lengths before cutting, taking into account the eylets on the ends if you want to correctly secure with chain or wire.
There was some minor warping of the large upper hull, so you will need to add bracing inside, around the turret ring to allow the turret to fit properly and not scrape the balls. Always bad to scrape your balls.
I did find some great in action photos on line that I used for ideas on weathering and base debris. A few details added were the stowage canvas bags from clean paper towels and the antenna which is wire and wire wrap.
Vince B. 3-22-17
Saturday, March 18, 2017
Here are some photos of the takom King Tiger with full interior.
Most of the weathering has not yet been done.
A lot of dryfiting in an attempt to get it right the first time.
Tom
Most of the weathering has not yet been done.
A lot of dryfiting in an attempt to get it right the first time.
Tom
![]() |
| Turret basket not yet installed |
![]() |
| Turret floor |
![]() |
| Engine all but disappeared |
![]() |
| Driver controls this side |
![]() |
| Radios this side |
![]() |
| back plate detail |
![]() |
| Hull roof sans weathering |
![]() |
| Turret sans weathering |
Friday, March 10, 2017
Mig 38-TX
This is a resin kit, Yes it is I, who built this RESIN kit, But its Jason Cameron's fault. Thank you Jason for the kit and opening my eyes to something new.
Though MIG has identified this as 1/35 scale, I adjusted that more appropriately by adding 1/48 scale German tank stowage equipment. I also added some other details to enhance the kit.
The design appears to be a bashed Panzer II turret and upper hull.
The details of the resin were very well done and the fit wasn't too bad. I had been prejudiced against resin from the early bubble filled blocks with uneven sides. This was well produced and except for some very brittle small pieces, worked out pretty well.
I did have to find some relevant decals to use.
Vince B. Mar 10, 2017
Sunday, March 5, 2017
MENG 1/35 French FT-17
Although this is a MENG kit, it was not at all easy. The nature of the vehicle design, makes it difficult to assemble the separate sections.
The most difficult part was the sing assemblies which secure the track sponsors to the hull. First off, the springs provided, intended to allow realistic movement, were way out of scale and needed to be replaced with wire.
Tracks are easily assembled and snap together allowing them to be workable. Fitting them tightly around the wheel assemblies isn't too easy. Not the fault of the kit, but the actuality of how the subject was engineered.
The kit comes with some interior detail, just enough to tease you into leaving the hatches open. It seemed accurate from the museum photos I found. The real noticeable missing feature for the Canon version is the shell racks behind the driver.
Tools were nicely detailed but required attachment with small bits of photo etched straps on the hull side. This is enough to drive me crazy but I managed.
Tracks are easily assembled and snap together allowing them to be workable. Fitting them tightly around the wheel assemblies isn't too easy. Not the fault of the kit, but the actuality of how the subject was engineered.
Vince B 3-5-17
Saturday, February 25, 2017
Monday, January 2, 2017
Krupp Big Bertha
This is the 1/35 Takom kit, that Tom Moon got me hooked on last year. Its a great kit, easy to build and no photo etch needed. Though Tom took the purist approach, out of the box, I decided it needed to be put into groundwork.
I found several fair photos from 100 years ago. Really hard to believe. It took 8 men to operate this thing. Not sure how long it took to erect on site. Each emplacement had to be graded and have the rear deck imbedded and leveled.
The front base plate allowed the steel wheels to shift as the rear crank moved the gear to adjust aim on the gun. There were several camouflage patterns used. I chose to try the leaf pattern and used layers of colors with spots of the putty pressed in place between paint colors. This took several weeks to accomplish on each of the section assemblies.
The man sized shells were lifted by a crane from a cart at ground level. The gun needed to be lowered to access the breach and the crane rotated with the shell forward to be slid into the open breach.
Vince B. Jan 2, 2017
Subscribe to:
Posts (Atom)