A full year in the making. The moment that you have all been waiting for... well many of you... OK, a few of you have been waiting for. This is the MENG Mk. V Male with completely detailed full interior. 

A full year in the making. The moment that you have all been waiting for... well many of you... OK, a few of you have been waiting for. This is the MENG Mk. V Male with completely detailed full interior. 

Another of the 1/72 scale Modelcollect Fist of War series, which of course I needed to enhance. I have a lot of scraps and leftovers from these kits, enough to collage. I had a leftover King Tigerish turret which was perfect for this. The kit came with a 120mm AA gun.
The barrel is scratch built using styrene and brass rod. I used Evergreen sheets with tile pattern for the add on armor. There are some unseen hydraulic cables added to the leg mechanisms.
Since I had sold all of my Vietnam dioramas, I needed a new one for the display case. As I was formulating the layout with the soldiers working on the detailed engine in the front, Master Box released a new figure set. "Somewhere in Saigon" which gave me the opportunity to expand the setting for the diorama. Then the dilemma... what to call it. I had two names narrowed down and as Don suggested, why not use both.
The build started with the old Tamiya M113 ACAV kit. This provided the basic details and interior I needed. The engine compartment was sparse and I wanted the hood open. I studied what seemed to be a chaotic stream of pics, where there weren't two engines alike. I selected the details which I could fabricate by adding hoses and wiring, This was enough to allow opening of the compartment. I used two figures from the kit and some hand tools from an Italeri kit.Vince B. 4-11-21
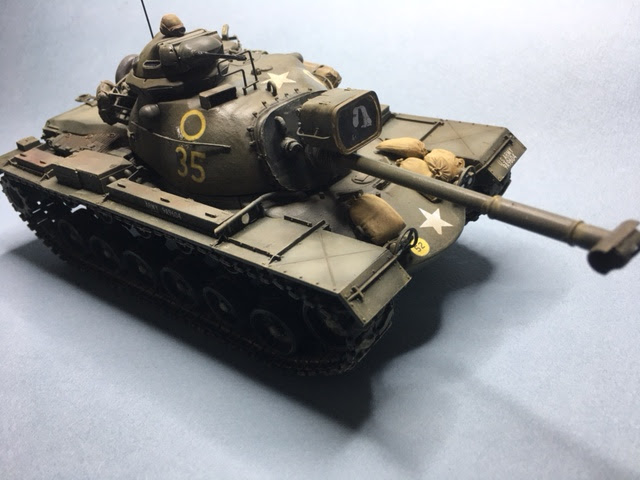
This is Dragon's 1/35th scale M-48 A-3 Patton. It is modeled after one from the US Army's 69th Armored Division, C Company, at the Battle of Khe Sanh in 1968. The decals are from Star Decals. Stowage is a mix of Legend stuff from Patton sets #1181 and #1306. The Patton is painted with Vallejo paints from the 6 bottle set entitled US Army Olive Drab. I only used 4 of the 5 shades of olive drab, up close, you can really see the difference in shading! The usual washes and weathering was done, I did use "Pan Pastels" for the final shading. I have used these before and I really like them and recommend them to our readers.
Now on to the next Patton, probably an M-60!!. Enjoy!!
I have yet to finish weathering (right side) and I still plan on putting on some stowage. I also have some other bits to add along with antennas.
This is Tamiya's M2A2 Bradley in 1/35 scale.
Yes, It,s a cargo Truck. Not a single gun to be seen. Why am I doing a TRUCK???
This is my Magach 6B Gal Batash, built for our IDF build competition. It is the Academy kit with some additions.
The stowage is from the kit, Black Dog, & Dioart. The coaxial machine gun is built from some kit and some Legend parts with EZ Line for the control cables. Non-slip surfaces are made from embossing powder. (Last photo shows this on turret before painting.) Cable supports on basket are made from Evergreen L-channel. The antenna is a length of fiber optic line. The tactical insignia panels are made from aluminum foil. Figure is from the kit.
Kit is painted mostly with acrylics. The main color is ModelAir Hemp. Tracks were painted with ModelMaster gun metal lacquer. Black pin wash added. Weathering is AK Middle Eastern Dust pigment held on with alcohol.
I recently completed the Takom M-9 ACE for the HAC Engineering Vehicle contest. The M-9 is built out of the box, base coat paint is Model Master Sand, #4720, and of course, heavily weathered. The kit allows you to pick 3 different blade/suspension posses; driving mode, blade down digging and suspension lowered, blade up with suspension raised up. I chose the last option with the blade up and suspension raised up.
It is modeled after an M-9 ACE serving in the 20th Engineers in Iraq.
In these 3 photos above you will see the rubble, ground cover, dirt and other debris I added to the blade and inside the bay.
And here are two more photos while under construction. Now go back in the blog's archives and look for Vince's version with blade down and digging! What a fun kit to build. And am probably going to add a base and more rubble.
Enjoy!
This was for practice, out of the box, not intended for contest performance. The FUMAN kit was old Bandai so there was a lot of missing detail.
I didn't add a lot of details or stowage. It did need an antenna. This was intended as E-Bay fodder.
Todays completion is of the Fictional Gun Tower. Yup lots of scrap parts on this one. The main turret was from a French AUF something or other kit by MENG, This was a donation by Tom Moon, The tower portion was scratch built from evergreen sheets and strips, before adding lots of other leftovers.
I did put in some subtle fiber optic lighting effects with the battery and switch under the turret.
Decals were exhumed from my scraps bag. I imbedded the tower base in my hodgepodge of groundwork. This time using styrofoam sheet as the base to protect the wood from warpage.
Vince B. 2-5-2021