Friday, April 10, 2020

Takom M-47 E/M Patton

This is Takom's kit #2072 in 1/35 scale.  The kit gives you several choices of actual vehicles, Iranian and Spanish.  I built it straight out of the box.   I chose the Spanish version, M-47 E, because it was painted in a shade of green I did not have--Spanish Green Khaki.  I used MIG 031 as called for in the instructions, then lightened some of the larger panels with Desert Yellow from Vallejo. 

The instructions have a picture of the actual tank from "Armored Light Cavalry, Regiment RCLAC (Santoago) n 1, from 1985.
Here we go, just finished  construction.  On to painting.  Used MIG 031, Spanish Green Khaki, my first paint job with MIG!  Gonn be using them quite often from now on!!


͒͒
My favorite view!

The unit's insignia, a shield with crossed flags.

Link and length tracks are easy to assemble.


Not certain the photo truly captures the true shade of spanish green- khaki?

COVID SHELF QUEEN #1

1 down, 9 to go. This is the 1/48 scale Tamiya Marder III kit.  I started it about a year go and now am going to call it done.  I've been going through a 1/48 phase lately and as always the box art drew me to this kit.  These little kits are getting a bit pricey for me, but they are beauties.  The build was typical Tamiya, no issues at all on fit or assembly.   I think it only took me a Saturday night and a Sunday to fully assemble and have ready for paint.
After assembly I primed the model with Tamiya's rattle can grey primer.  I let that dry for about 3 hrs (with help from a hair dryer) and then I painted the entire model Tamiya's German Grey (XF-63).  I then left it all to dry for 48 hrs.

I decided to have a go at Ammo by Mig's Washable White.  After the German Grey was set (48hrs) I sprayed the entire model with Mig's Washable White (A.MIG-024).  I let that set for 3 to 4 hrs and then I used a water moistened coarse brush to scrub off the white in certain areas.  At first I was not happy with it, so the project was exiled to the Shelf of Doom and sat there until last week.


Going stir crazy, I picked this up and decided it was salvageable.  I gave it a filter of brown for white (A.MIG-1500) and then started some oil washes (overall with umber and 2nd pin wash with black).  I then did some chipping and rust applications with various acrylic paints. Last was the application of various dirty looking pigments.  It was all sealed with a coat for Testor's acrylic clear flat.
I constructed a small base and added a piece of fence I built from cut down coffee stir sticks. and weathered it with a wash of Tamiya enamel brown.  The little schrub is from SuperTrees that I flocked with some static grass.


All in all it turned out OK.  I can see many warts in the photos, but for being ignored for a year+ she came out satisfactory for me.  I've got 9 more Shelf of Doom queens remaining to be tackled.  Based on the current situation I think I'll have time to hit a few more.

Thanks for looking, George


Wednesday, April 8, 2020

MENG MAGACH 6B 6th Part


MAGACH 6B BUILD
PART 6

I have been busy with work over the last few weeks, and it is slowing down the progress of my build, but I am seeing the light at the end of the tunnel on this project.
So far it has been an interesting build and overall I am pleased with the level of detail on the model as well as the fit. Except for the tracks. The tracks are individual links, but they come with a jig assembly and pins that need to be inserted on both sides which make them workable. But, I was not successful in this endeavor. Many of the pins did not slide in like they were supposed to and some of the other broke as I was trying to remove them from the sprue. After getting frustrated, I put them aside and ordered Fruilmodel tracks which arrived today. I will spend some of the upcoming days assembling these for installation once the remainder of the kit is completed. I do not understand why vinyl tracks were not included with this kit, it would have been so much better.
Anyway, I had assembled both sets of the side skirts and mounted them to the fenders. The sides skirts come with a forward section of two panels, each with an outer side and an inner side. The aft section is one piece. These panels are nicely detailed and are easily mounted to hangers that are attached to a longer supporting piece that then mounts to attachment points on the fenders. I did notice that the aft sections were towed in more than the forward section. This is due to them not being as thick as the forward panels, thus leaving an odd looking offset from the forward panels. I pulled them out ever so slightly with my finger and glue them in place so now the offset looks more natural.


The Magach 6B series is based on the M60 Rise. To bring it up to more modern standards of protection and capability, the IDF added more armor and ERA to the turret and hull. A new Fire Control system with optics was added along with Smoke Grenade Launchers that appear to be the same setup from their version of the Centurion. The “add on” armor for the turret comes in six sections. Two ERA block sections for the top of the turret, and then four three piece sections for the turret sides. I experienced no fit problems in either assembly of any of these section nor with their installation on the turret.
Each section had a different ID so I decided to assemble all of them and kept them separated to eliminate any confusion.

You can see the Smoke Grenade Launchers in this photo. The assemblies were easily constructed and mounted to the turret with no issues.


The Mantlet has a vinyl piece that fits between the Mantlet and the Turret body. It is nicely molded but it needs to be “encouraged” to fit properly. This took more time than I expected and I don't understand why Meng did not provide this piece as a single piece of plastic since you wouldn't be able to move the Mantlet after it was installed. It ended up leaving a gap on the bottom, but I have that filled in and will not be visible once construction is complete.

I am impressed with the level of detail in this kit and I am getting more excited as I move closer to having her completed.

Be safe out there.

Cheers,
WL

Tuesday, April 7, 2020

Magach 6B

This is Part 10 and final of the Academy kit. Overall it is a great kit if you are careful and read ahead to understand how it all fits together. Also some research on the subject matter will help you understand the options available in the kit.


My final steps were regarding detail painting and weathering after installing the stowage. Note that ALL stowage goes on the turret ad in the rear basket. You wont find any lower hull stowage.  As you can see that the turret would be impeded by any surface mounted equipment.


The stowage was a combination of kit provided crates, gas and water cans along with some Legend Resin packs and bedrolls.


The final weathering was a combination of oil washes and pigments.

I am happy with the detail modifications I made to the M2 that did NOT come in the kit.

Vince B.  4-8-20


Sunday, April 5, 2020

Academy Magach 6B

This is Part 9 for some final notes.  I have completed the decaling and most of  detail painting before washes and stowage additions. At this point I only have one note.


 A) DECALS.... I do like decals that are thin and slide right onto the surface. These did NOT. After only ~ 1 min in the water, the decals came right off on their own and just curled up in the water. Not good.  The first few time this happened I had to carefully unroll them and apply. Then they did not seem to want to stick, especially the stripes around the barrel. They kept unwrapping.  I needed to apply setting solution over all of the decals.


Later this week I will post the final completed and mounted model.

Vince B.  4-5-20

Char B1 Bis

Tamiya 1/35 scale kit fell right together. Tracks were snap together individual links. The kit includes a figure, tow chains and shackles.  The instructions include color charts and decals for 4 different named tanks. There are optional parts based on the various tanks. 


I really didn't need to make major modifications.  I added the full antenna and changed out the lift hooks on the turret substituting some spares. I painted the camo pattern freehand with an airbrush. After several gloss coats, I washed with oils.

The decals almost put themselves on.They went right into place even over the rivet and hull details. I did use solvent just to be sure they hugged down.

The chains were perfect though since they were chrome, needed to be primed before painting. The tools were painted individually since they needed to be installed in he rack in a certain order.

Vince B.  4-5-20

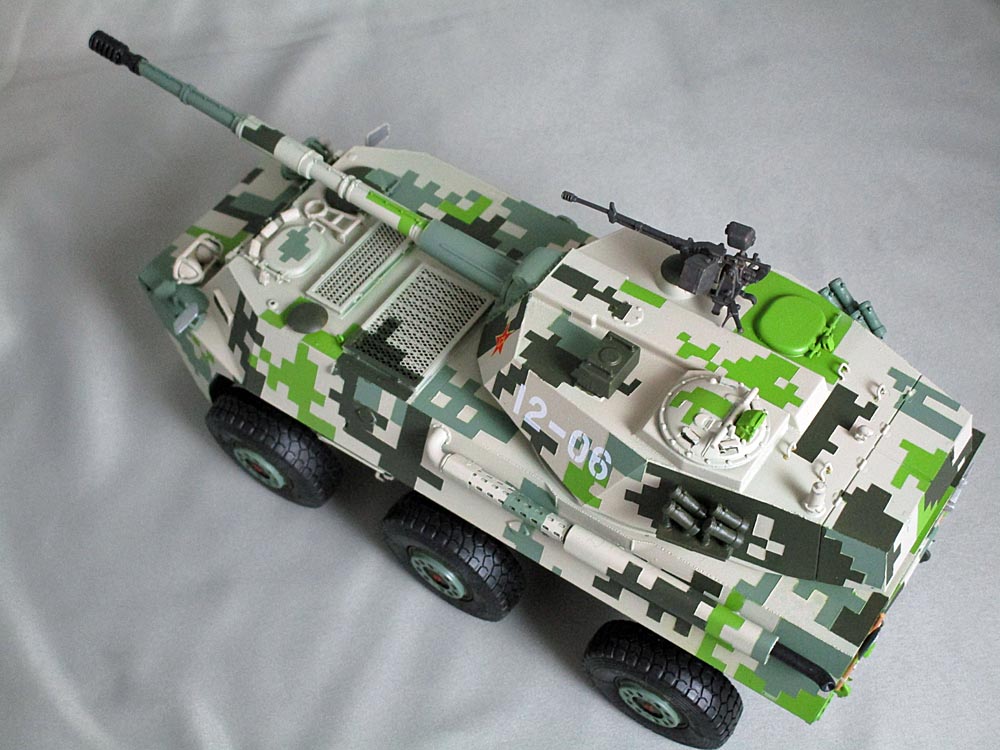
Chinese PLA PTL02 Tank Destroyer

We interupt your regularly scheduled Magach builds for a drone pilot recognition model. I finally finished the Chinese PTL02 tank destroyer I 've been working on. I chose to paint it in a digital camo scheme to try something new and different. Results are varied.


I made the masks by placing Tamiya masking tape over grid template made by Alexen Model, and then traced the grid with a knife to cut out the mask. I've included one photo of the first masks in place on the first coat of paint. It is 4-color camo, so 3 layers of masks were required. I also had to paint the model in reverse order, darkest to lighest, instead of lightest to darkest.


The template has 1mm, 1.5mm, 2mm, & 3mm grids. It works well except I think I really needed 2.5mm squares. Oh well. I did some masks in 3mm and others in 2mm. Ended up with a decent approximation of the real pattern. It ends up with a bit of paint edge buildup on the early masks, though. Also, you need to be really careful at squaring up masks and making them touch properly. I didn't always do that.


As it is a recognition model, I didn't put any washes or weathering on it as these were not required.


Interesting camo pattern to attempt. Would I try again? Maybe. 4-color on this large an object is a lot of work. I spent 4-6 hours total just cutting and applying masks. We'll see.

Forgot to mention, I had to leave the tow chain off the vehicle as it shattered into mutiple pieces when cutting it off the sprue. VERY fragile.

Saturday, April 4, 2020

Academy Magach 6B

This is Part 8 of the Academy kit. Getting close to the fun parts, detail painting and weathering. I have done the final base color coverage and working on stowage. I hope you can see some color variations on the tank.  This is the pre-shading by use of a dark gray primer and light coats of the grey / green. Using Modelmaster Enamels this was a mix of ~ 50 / 50 Dark Gull Grey with Olive Drab.


There are a few points to make on the final construction:
A) There are splash guards under the rear fender which wrap around the transmission housing. This is in reality a thin sheet of bent steel.  These parts on the kit do not fit as intended and need to be modified by filing and sanding with continual test fitting to jam them up under the fender and glued in. Not a big deal to work this out, but an unexpected detail.

B) The Magach 6B encompassed several upgrades.  This kit choose to proceed with the Mantlet Cover that did NOT mount the 50 Cal M2 machine gun. I wanted the gun and all the details that go along with it. So what you see has been fabricated.  The kit provides the bare M2 and Mount.  It does not include any mounting details for the ammo can, the spent shells bag and mount, or the remote operating mechanism.  I scrounged through my tiny detail parts to find SIMILAR looking components and worked up a reasonable facsimile.

Now its onto the detail painting then gloss coating.

Vince B.  4-4-20

Thursday, April 2, 2020

MENG MAGACH 6B 5th Part


MAGACH 6B BUILD
PART 5

The steps here are for the fenders and some minor details on the lower hull.

The first thing the instructions have you do is to drill a number of 1mm holes into each fender. I do not know why, in this modern age why kit manufacturers will still occasionally have the modeler manually drill holes in parts. In this case, it could very well be that those same fenders are used in other kits. As an example, I know that Meng also manufactures and earlier version of this same subject.
At any rate, there are a substantial amount of parts on each fender. Tool boxes , tracks and so forth. One interesting piece, is that on the right fender near the rear, there is a well molded shovel. Usually with tools, especially shovels, the bracket that holds the shovel is molded to the shovel. That is not the case here. The large bracket that holds the shovel is a separately molded plastic piece that fits over the shovel giving the whole assembly a very detailed finish. Other than that, there is nothing particularly remarkable about these fenders. All of the attaching parts and pieces went together with no problems.


The handles on each of the tool box covers are individually molded plastic parts. They have no flash and went on perfectly, except that I wasn't paying attention and actually glued one laying down, but it still looks natural.

After the parts were mounted to the fenders, it was time to mount them to the lower hull. Fortunately, I dry fit them before gluing, and I discover that not all of the slots in the hull that were to received the studs from the fenders were through holes. So I used my xacto knife to open them up which then allowed the fenders to fit better, So I glued them on and used my clamps keep them in position until they dried.
Once the fenders are installed, the next step is to mount a couple of vinyl that fit between the forward part of the fenders and the lower hull to fill up the gaps between the fenders and the hull. Once that was complete, then the ERA block piece was attached to the upper glacis. Following this, the headlights were assembled an mounted (I painted the back sides silver chrome and put a liquid mask on the front to protect the headlights). Then the forward mud flaps and one piece of photo etch on the front left fender.


On the rear of the vehicle there were two curved pieces that were to be mounted to rear of the vehicle near the engine exhaust diffuser doors. However, the instructions were not very clear about how these pieces were to be installed. I was about to have a fit, until I consulted my reference book and then discovered how they were supposed to be installed on the real vehicle.
The instructions also called for the installation of the tow cables to the upper glacis, but I have decided to paint them prior to installation, and after the model has been painted.


In summary, this is a very detailed kit and not too difficult to assemble, although it does require the modeler to pay close attention at times. That being said, she is shaping up nicely and I am excited to get to the final product.


Cheers,
WL

Monday, March 30, 2020

Marder III M

I did have this planned for an April completion.  So I am a few days early.
This is the 1/48 Tamiya kit of a late version of the Marder as mounted on the 38T Chassis.
Since it is a Tamiya, do I need to say more?  Ok. I will.
Of course the fit was perfect and the gun can actually swivel and elevate if you are careful with the assembly. The only detail which I thought needed work was that the  75mm rounds do not actually fit into the ammo slots in the interior. What I did was to cut down the shells and use only the heads. This way I could insert a few into the holders.
I did add some Black Dog and other parts stowage as well as accessories from Tamiya figure sets. The tiny straps are 1mm tape. I do like stowage and don't go overboard with it. Just enough to be interesting. I use ship rope to tie everything down.
I used enamel paints and oil washes with some pigment powders. The camo pattern is airbrushed freehand and blended with the washes. To answer the other question, Yes I do normally fix the stowage to the primed model before painting.  Once I find an arrangement I like, I glue in place and rope down. After finishing paining the model details I hand brush the stowage details.

Vince B.  3-30-20.


Academy Magach 6B

This will be Part 7 of the build of the Academy kit.

This review is of the Turret and fittings steps #9 thru #12.  The major components just fall together. I did find a few items to warn you about.

A) In Step 9 when assembling the Mantlet Armor you have a choice of with or without the Machine Gun mounting. Later on you will discover that part M38 will need to be trimmed to allow the installation of the main gun barrel. This isn't a problem to cut and sand off the flap in step # 11.


B) In step #10, the details on the Coupola.  The small handles are mis-marked  as K21. You will easily figure this out on the sprue. This assembly is fidley and I ended up with a working hatch to allow a figure. You want to make this decision to help with the closure fit of the hatch.  Be careful of the view ports parts E66 as they can interfere with the hatch closure.

C) The Stowage Basket after assembly is a real tight fit on the turret. Keep dry fitting on the turret while the parts are drying to get the best fit.

D) You need to be careful in assembling the 2 piece barrel. If you are there is very little seam clean up needed. Its hard to get between the details for clean up.


I have left off the last fidleys until I have selected and fitted stowage.

Vince B.  3-30-20


Sunday, March 29, 2020

MENG MAGACH 6B 4th Part


MAGACH 6B BUILD
PART 4

The steps highlighted here are for the lower hull. They include the drivers hatch and periscopes, the belly pan, the hull deck and the rear portion of the hull.

First, the deck for the lower hull is 10 parts. It consists of two main parts; the forward part consists of the drives hatch and turret ring, and the aft portion is the engine cover. The balance of the pieces are the access panels to the engine compartment, this arrangement allows for tremendous detail to be molded into the individual pieces, so I wasn't too put out about the assembly. First, lets deal with the drivers hatch. On this model, the drives hatch can open, however, the tolerance on the hatch fittings was too tight to allow it to open and close freely. Based on this I decided to glue it closed.
The next thing to deal with was the drivers periscopes. There are clear plastic parts as periscopes that fit into holes around the drives hatch. There is one hole that accepts a stud on each periscope piece. However, the holes were too small and it took me more than an hour to widen them enough (laterally) to accept the periscopes. Before I mounted the periscopes, I used Vallejo Liquid mask on each front facing portion. I then painted each periscope with Tamiya clear blue. Each periscope has a cover so I glued those on after gluing the periscopes to the hull.

After gluing the forward and aft portions of the upper hull, the next step was to assemble the engine exhaust diffuser doors. These are two piece assemblies and are exceptionally molded, with zero fit problems. Once this was complete, the upper hull engine access panels needed to be installed, this was a total of eight pieces, and they all fit with no issues.


Once the upper hull was installed, it was time to install a nose piece to the lower hull that fits onto the lower front glacis plate. After that is installed then the belly pan gets installed. There were 6 pieces to glue to the belly pan. Two of the six pieces appear to be turnbuckles that attach to the rear hull.

To date, I am pleased with the detail and fit of this kit with the exception of the drivers hatch and its periscopes. The next steps will be assembly of the sponsons/fenders. and various upper hull details.

Cheers,
WL


Academy Magach 6B

This is Part 6 which covers steps #4 thru #8.

A) I have completed the lower and upper hull assemblies. As you can see I have primed and painted them. I mixed the Israeli color from Dark Gull Grey and Olive Drab Model Master enamel paints. This will get darker after applying the oil washes.


B) I have already weathered and pigmented the lower hull and wheel areas in advance of attaching the upper hull. 

C) This would have been difficult or incomplete since I had attached the side armor to the upper hull. I believe that the best practice would be to leave off the side armor until later after attaching the upper hull and weathering the wheel area and tracks. 


Next will be to complete the turret assembly and final bits. 

Vince B.  3-29-20